🖭 How to resize a virtual disk
If you work with VMs it is very common that sometimes you need more space, but your VMs were defined with an estimated size. I started to use Virtual Machine Manager to manage my VMs when I joined to Red Hat (sorry but in my previous life I usually used Oracle VM VirtualBox) and sometimes I need to resize my image files but I didn’t know how to do it.
Thanks to Oscar Arribas Arribas I learned to do it using a few
virt-xxx commands. It is very possible to do it using other commands/steps/alternatives however
this way is good for me.
Step 0️⃣ - Checking current VM disk size
Inside of your VM you can check the size of the each disk with the df command:
[rhmw@f38mw01 ~]$ df -h
Filesystem      Size  Used Avail Use% Mounted on
devtmpfs        4.0M     0  4.0M   0% /dev
tmpfs           977M     0  977M   0% /dev/shm
tmpfs           391M  1.3M  390M   1% /run
/dev/vda3        19G  4.7G   14G  26% /
tmpfs           977M   40K  977M   1% /tmp
/dev/vda3        19G  4.7G   14G  26% /home
/dev/vda2       974M  257M  650M  29% /boot
tmpfs           196M   56K  196M   1% /run/user/42
tmpfs           196M   40K  196M   1% /run/user/1000
Here the home has 20G allocated. I would like to extend it to 40G.
Step 1️⃣ - Creating a new disk image
Your VM must be stopped before starting to resize it using a new disk image with the desired size.
We can create a new disk using the qemu-img tool, something like this:
on 🎩 ❯ qemu-img create -f qcow2 f38mw01-resized.qcow2 40G
Formatting 'f38mw01-resized.qcow2', fmt=qcow2 cluster_size=65536 extended_l2=off compression_type=zlib size=42949672960 lazy_refcounts=off refcount_bits=16
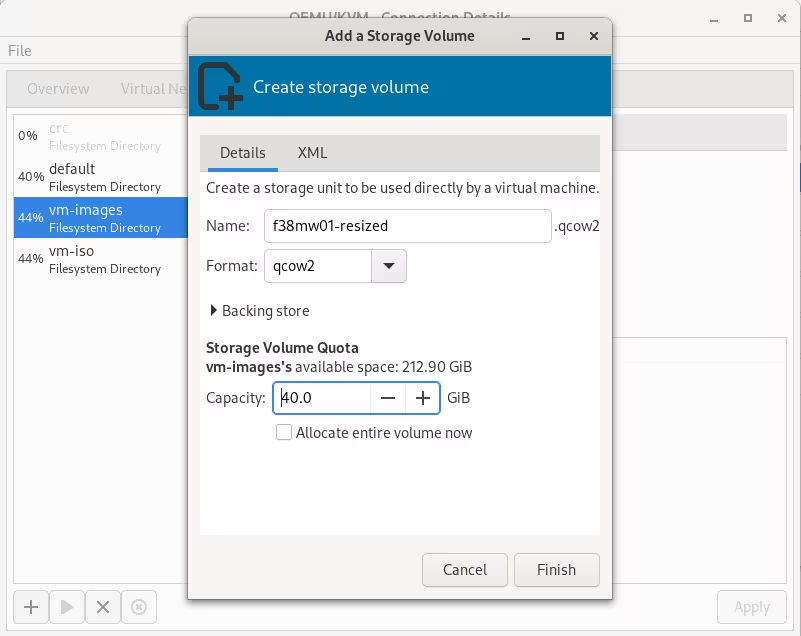
Or creating the new image file by the Storage tab in the virt-manager Connection Details option (Edit -> Connection Details):
Step 2️⃣ - Renaming the old disk image
Rename the old image file as a backup file (it could be needed to use in a roll-back case):
mv f38mw01.qcow2 f38mw01.qcow2.backup
You can also describe the file systems in the old image file:
on 🎩 ❯ sudo virt-filesystems --long -h --all -a f38mw01.qcow2.backup
Name                                     Type       VFS     Label                 MBR Size Parent
/dev/sda1                                filesystem unknown -                     -   1.0M -
/dev/sda2                                filesystem ext4    -                     -   973M -
/dev/sda3                                filesystem btrfs   fedora_localhost-live -   19G  -
btrfsvol:/dev/sda3/home                  filesystem btrfs   fedora_localhost-live -   -    -
btrfsvol:/dev/sda3/root                  filesystem btrfs   fedora_localhost-live -   -    -
btrfsvol:/dev/sda3/root/var/lib/machines filesystem btrfs   fedora_localhost-live -   -    -
/dev/sda1                                partition  -       -                     -   1.0M /dev/sda
/dev/sda2                                partition  -       -                     -   1.0G /dev/sda
/dev/sda3                                partition  -       -                     -   19G  /dev/sda
/dev/sda                                 device     -       -                     -   20G  -
Step 3️⃣ - Truncating the new disk image
Truncate the old image file and resize the new image file with the new space:
on 🎩 ❯ sudo truncate -r f38mw01.qcow2.backup f38mw01-resized.qcow2
on 🎩 ❯ sudo truncate -s +20G f38mw01-resized.qcow2
Step 4️⃣ - Expanding the new disk image
Expand the new image file using as base the old image file. In this step I am expanding the physical disk mounted
for the home folder.
on 🎩 ❯ sudo virt-resize --expand /dev/sda3 f38mw01.qcow2.backup f38mw01-resized.qcow2
[   0.0] Examining f38mw01.qcow2.backup
**********

Summary of changes:

virt-resize: /dev/sda1: This partition will be left alone.

virt-resize: /dev/sda2: This partition will be left alone.

virt-resize: /dev/sda3: This partition will be resized from 19.0G to 39.0G.
 The filesystem btrfs on /dev/sda3 will be expanded using the
‘btrfs-filesystem-resize’ method.

**********
[   2.6] Setting up initial partition table on f38mw01-resized.qcow2
[  13.4] Copying /dev/sda1
[  13.4] Copying /dev/sda2
 100% ⟦▒▒▒▒▒▒▒▒▒▒▒▒▒▒▒▒▒▒▒▒▒▒▒▒▒▒▒▒▒▒▒▒▒▒▒▒▒▒▒▒▒▒▒▒▒▒▒▒▒▒▒▒▒▒▒▒▒▒▒▒▒▒▒▒▒▒▒▒▒▒▒▒▒▒▒▒▒▒▒▒▒▒▒▒▒▒▒▒▒▒▒▒▒▒▒▒▒▒▒▒▒▒▒▒▒▒▒▒▒▒▒▒▒▒▒▒▒▒▒▒▒▒▒▒▒▒▒▒▒▒▒▒▒▒▒▒▒▒▒▒▒▒▒▒▒▒▒▒▒▒▒▒▒▒▒▒▒▒▒▒▒▒▒▒▒▒▒▒▒▒▒▒▒▒▒▒▒▒▒▒▒▒▒▒▒▒▒▒▒▒▒▒▒▒▒▒▒▒▒▒▒▒▒▒▒▒▒▒▒▒▒▒▒▒▒▒▒▒▒▒▒▒▒⟧ --:--
[  15.8] Copying /dev/sda3
 100% ⟦▒▒▒▒▒▒▒▒▒▒▒▒▒▒▒▒▒▒▒▒▒▒▒▒▒▒▒▒▒▒▒▒▒▒▒▒▒▒▒▒▒▒▒▒▒▒▒▒▒▒▒▒▒▒▒▒▒▒▒▒▒▒▒▒▒▒▒▒▒▒▒▒▒▒▒▒▒▒▒▒▒▒▒▒▒▒▒▒▒▒▒▒▒▒▒▒▒▒▒▒▒▒▒▒▒▒▒▒▒▒▒▒▒▒▒▒▒▒▒▒▒▒▒▒▒▒▒▒▒▒▒▒▒▒▒▒▒▒▒▒▒▒▒▒▒▒▒▒▒▒▒▒▒▒▒▒▒▒▒▒▒▒▒▒▒▒▒▒▒▒▒▒▒▒▒▒▒▒▒▒▒▒▒▒▒▒▒▒▒▒▒▒▒▒▒▒▒▒▒▒▒▒▒▒▒▒▒▒▒▒▒▒▒▒▒▒▒▒▒▒▒▒▒⟧ 00:00
[  48.0] Expanding /dev/sda3 using the ‘btrfs-filesystem-resize’ method

virt-resize: Resize operation completed with no errors.  Before deleting
the old disk, carefully check that the resized disk boots and works
correctly.
Step 5️⃣ - Starting the VM with the new disk image
Rename the new disk image as the original one used by the VM:
on 🎩 ❯ mv f38mw01-resized.qcow2 f38mw01.qcow2
Start the VM and the check that our home has more space:
[rhmw@f38mw01 ~]$ df -h
Filesystem      Size  Used Avail Use% Mounted on
devtmpfs        4.0M     0  4.0M   0% /dev
tmpfs           977M     0  977M   0% /dev/shm
tmpfs           391M  1.3M  390M   1% /run
/dev/vda3        39G  4.7G   34G  13% /
tmpfs           977M   40K  977M   1% /tmp
/dev/vda2       974M  257M  650M  29% /boot
/dev/vda3        39G  4.7G   34G  13% /home
tmpfs           196M   56K  196M   1% /run/user/42
tmpfs           196M   40K  196M   1% /run/user/1000
The /dev/vda3 now is 34G (in the step 0, the size was 19G). Great!!!
Bonus Track 💡 - Resizing Microsoft Windows VMs
I know, I know what you are thinking 🤔 … this stuff works because I am using a Linux OS 😇. However, this process also works for Windows VMs.
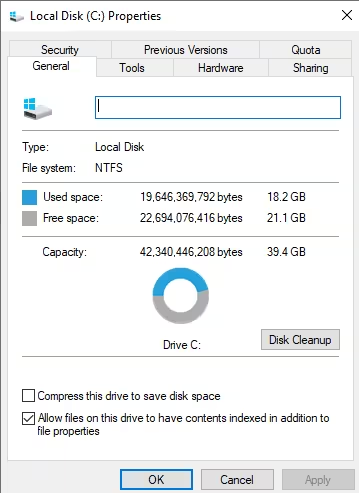
Here an example of a Windows 10 with a hard disk of 40G to extend to 50G:
The process is exactly the same:
Create new disk image:
on 🎩 ❯ qemu-img create -f qcow2 win10-resized.qcow2 50G
Formatting 'win10-resized.qcow2', fmt=qcow2 cluster_size=65536 extended_l2=off compression_type=zlib size=53687091200 lazy_refcounts=off refcount_bits=16
Back the original disk image:
on 🎩 ❯ mv win10.qcow2 win10.qcow2.backup
Check the file systems of the old image:
on 🎩 ❯ sudo virt-filesystems --long -h --all -a win10.qcow2.backup
Name       Type        VFS   Label            MBR  Size  Parent
/dev/sda1  filesystem  ntfs  System Reserved  -    579M  -
/dev/sda2  filesystem  ntfs  -                -    39G   -
/dev/sda1  partition   -     -                07   579M  /dev/sda
/dev/sda2  partition   -     -                07   39G   /dev/sda
/dev/sda   device      -     -                -    40G   -
Truncate the new disk image:
on 🎩 ❯ sudo truncate -r win10.qcow2.backup win10-resized.qcow2
on 🎩 ❯ sudo truncate -s +10G win10-resized.qcow2
Expand the new disk image:
on 🎩 ❯ sudo virt-resize --expand /dev/sda2 win10.qcow2.backup win10-resized.qcow2
[   0.0] Examining win10.qcow2.backup
**********

Summary of changes:

virt-resize: /dev/sda1: This partition will be left alone.

virt-resize: /dev/sda2: This partition will be resized from 39.4G to 49.4G.
 The filesystem ntfs on /dev/sda2 will be expanded using the
‘ntfsresize’ method.

**********
[   1.9] Setting up initial partition table on win10-resized.qcow2
[   2.8] Copying /dev/sda1
[   3.6] Copying /dev/sda2
 100% ⟦▒▒▒▒▒▒▒▒▒▒▒▒▒▒▒▒▒▒▒▒▒▒▒▒▒▒▒▒▒▒▒▒▒▒▒▒▒▒▒▒▒▒▒▒▒▒▒▒▒▒▒▒▒▒▒▒▒▒▒▒▒▒▒▒▒▒▒▒▒▒▒▒▒▒▒▒▒▒▒▒▒▒▒▒▒▒▒▒▒▒▒▒▒▒▒▒▒▒▒▒▒▒▒▒▒▒▒▒▒▒▒▒▒▒▒▒▒▒▒▒▒▒▒▒▒▒▒▒▒▒▒▒▒▒▒▒▒▒▒▒▒▒▒▒▒▒▒▒▒▒▒▒▒▒▒▒▒▒▒▒▒▒▒▒▒▒▒▒▒▒▒▒▒▒▒▒▒▒▒▒▒▒▒▒▒▒▒▒▒▒▒▒▒▒▒▒▒▒⟧ 00:00
[  55.7] Expanding /dev/sda2 using the ‘ntfsresize’ method

virt-resize: Resize operation completed with no errors.  Before deleting
the old disk, carefully check that the resized disk boots and works
correctly.
Rename the new disk using the original name
on 🎩 ❯ mv win10-resized.qcow2 win10.qcow2
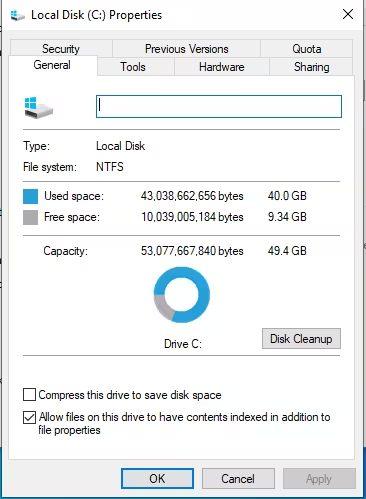
Start the VM and check the new disk size:
🚩 Happy resizing!!! 🤖


